
# Getting Started
::: warning Caution This page is for the development environment set up only, and it is subject to changes.
For anyone interested in joining the Crypto.com chain testnet, please refer to our testnet documentation. :::
By following this tutorial, you can compile and run the latest version of Crypto.com Chain from scratch. With supported hardware, you can run the chain locally within a cup of coffee ☕. However, this document aims to provide you with a step-by-step guide to run Crypto.com Chain locally and not a guide for production usage.
# Pre-requisites
Because we utilize the technology of Intel® Software Guard Extensions (Intel® SGX)
for payment data confidentiality, the pre-requisites are a little more strict than the other
chains' setup. A special type of hardware is needed and the reference of SGX-hardware
could help you identify if your current hardware supports Intel® SGX or not.
If your development machine does not support SGX, we recommend spinning up a cloud instance listed in the above reference. In this guide, we will walk through the process of setting it up on Azure Confidential Compute VM.
# A bird's-eye view
Before diving into details, we would like to introduce you the big picture of Crypto.com Chain's main components as following:
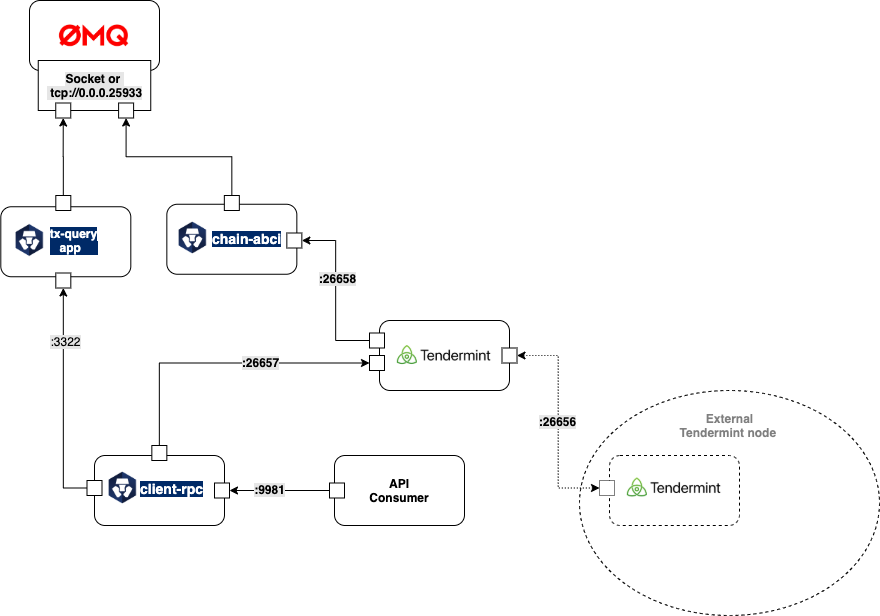
At the end of this getting-start document, you will be running four components:
chain-abcias main chain process.client-rpcas rpc server for client's interactions.tendermintfor consensus.tx-query-appallows semi-trusted client querying of sealed tx payloads.
# Azure VM creation
Get into the portal of Azure computing and create a new Azure Confidential Compute VM as following config. Noted that Ubuntu Server 18.04 is recommended.
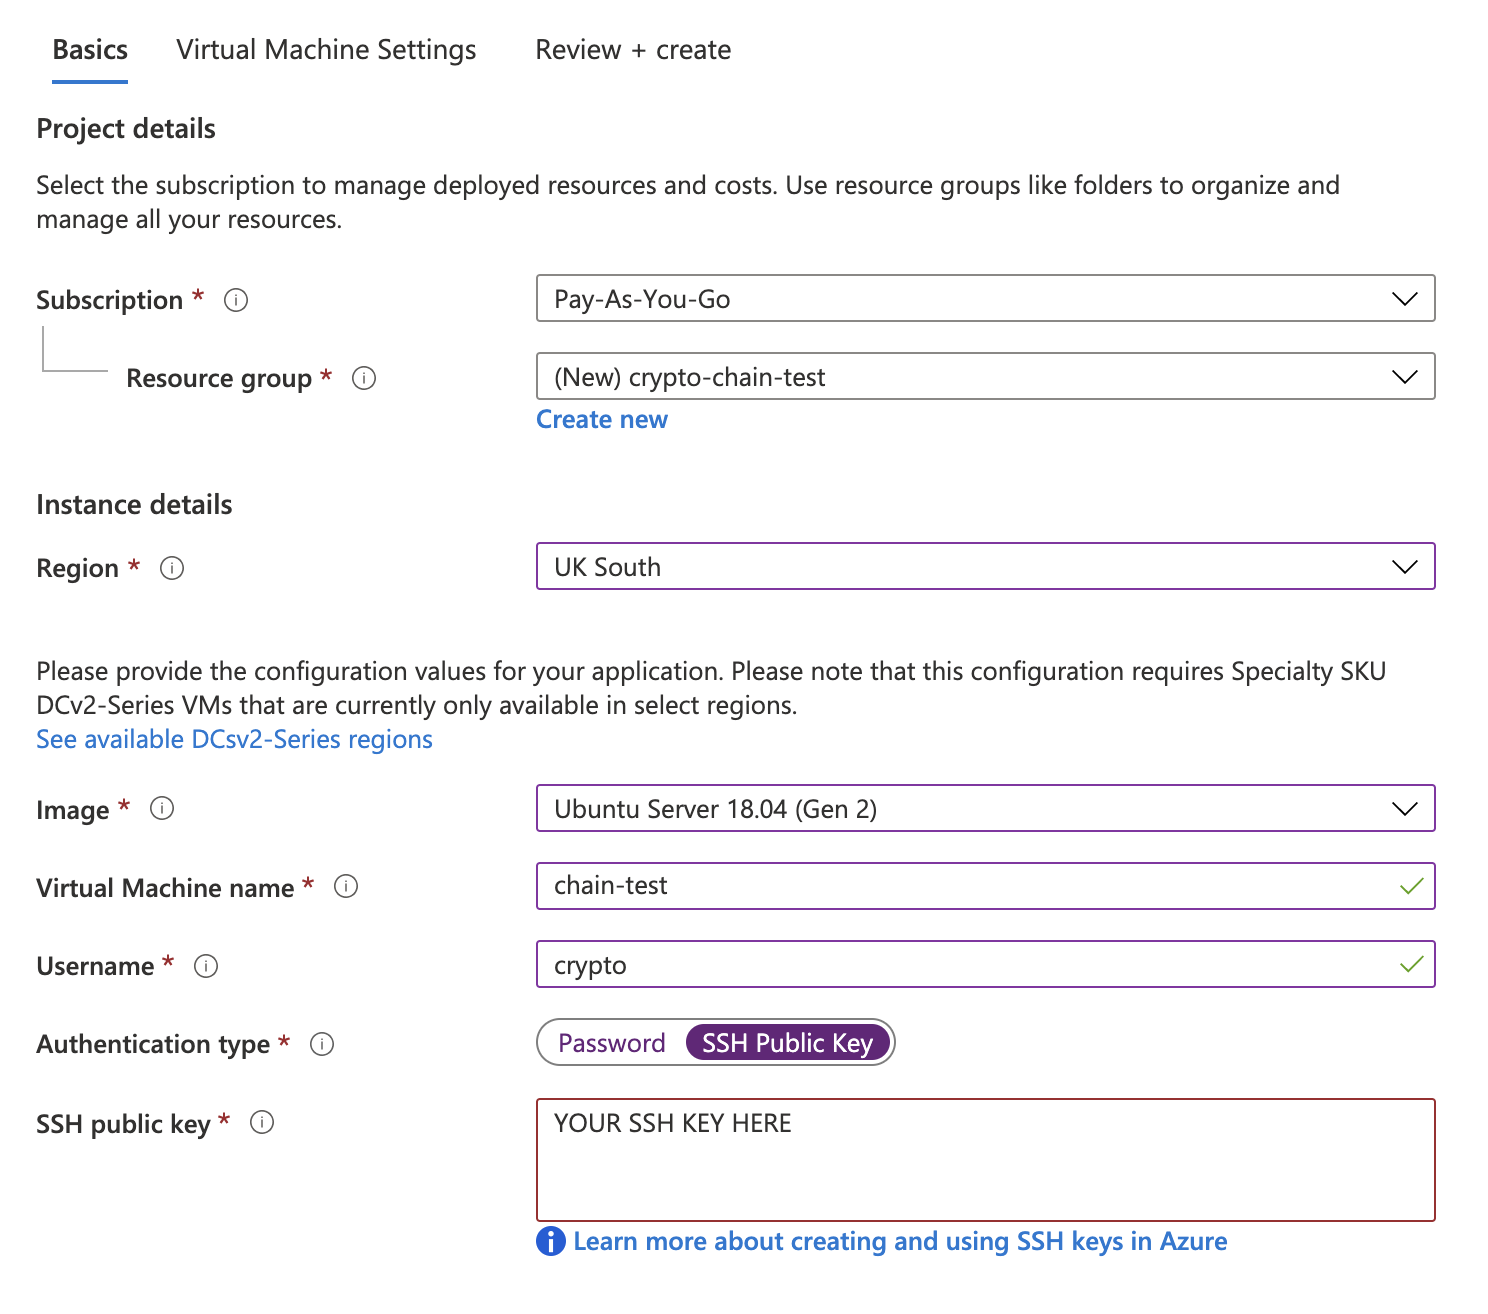
Make sure to enable SSH public inbound ports:
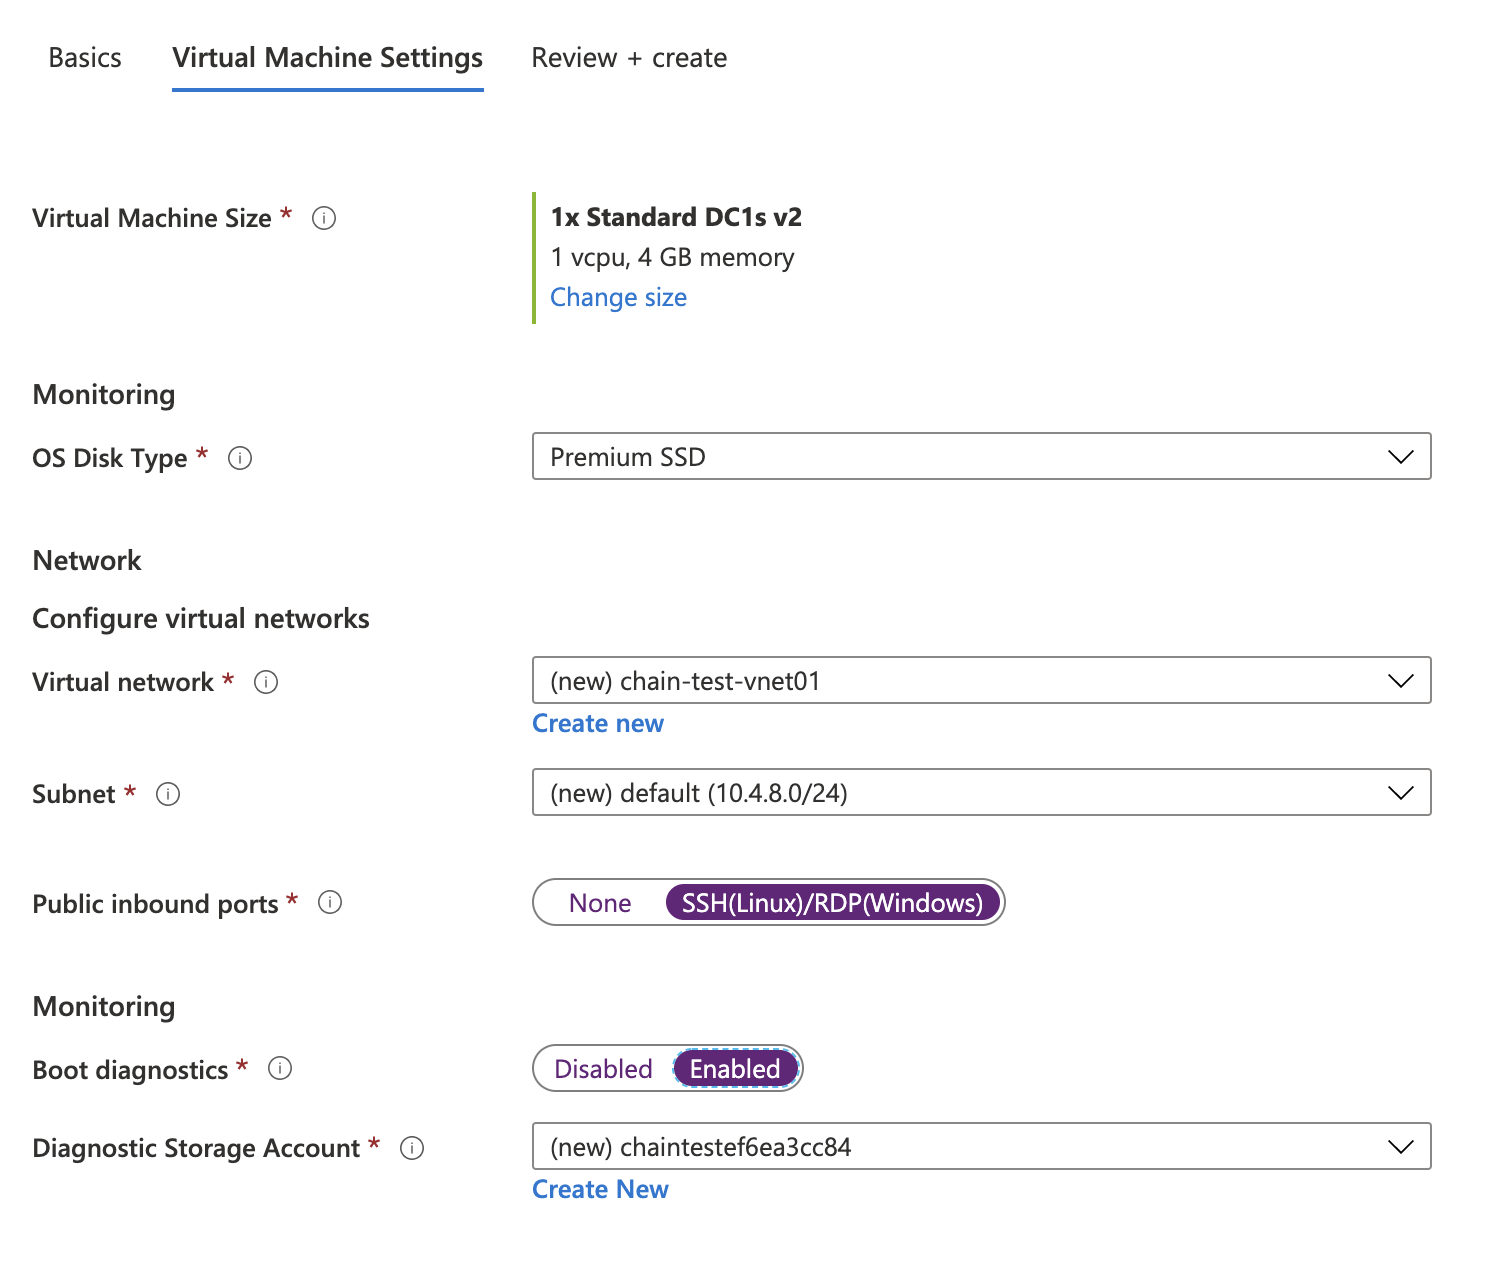
Then choose your desirable VM location, size, storage and network configs, or you can leave
them as default.
# VM environment setup
SSH to the Azure VM, and start the environment setup for Crypto.com Chain.
- Install
Docker: you can refer to following document How To Install and Use Docker on Ubuntu 18.04
Make sure you have complete the part of Executing the Docker Command Without Sudo by:
sudo usermod -aG docker ${USER}
- Install build dependencies
sudo apt install build-essential
- Clone the main chain repo
git clone https://github.com/crypto-com/chain.git
# Build binary and Docker images
# 1. Build the Crypto.com Chain binary files:
$ cd chain/
$ make build
It will take you several minutes, and check the binary files share object files in following directory:
$ ls target/debug/

chain-abci client-rpc client-cli tx-query-app ...
# 2. Build the docker image with local binary files using following command:
$ make image
Check the current built image with:
$ docker images

REPOSITORY              TAG                 IMAGE ID            CREATED             SIZE
crypto-chain            develop             817f6c7c7a76        - seconds ago      940MB
# Prepare SPID & KEY
Before kicking off all the components, there is one more step to go, which is registering your own accessing ID and KEY for Intel SGX attestation service.
:::tip Enhanced Privacy ID (EPID) The Intel SGX attestation service is a public web service operated by Intel for client-based privacy focused usages on PCs or workstations. The primary responsibility of the Intel SGX attestation service is to verify attestation evidence submitted by relying parties. The Intel SGX attestation service utilizes Enhanced Privacy ID (EPID) provisioning, in which an Intel processor is given a unique signing key belonging to an EPID group. During attestation, the quote containing the processor’s provisioned EPID signature is validated, establishing that it was signed by a member of a valid EPID group. A commercial use license is required for any SGX application running in production mode accessing the Intel SGX attestation service. :::
In short, you should go to Intel Portal to sign up for the ID and KEY. It won't take you more than 5 minutes.
Make sure what your subscription is DEV Intel® Software Guard Extensions Attestation Service (Unlinkable). Your SPID and Primary key will be shown on the portal as below:
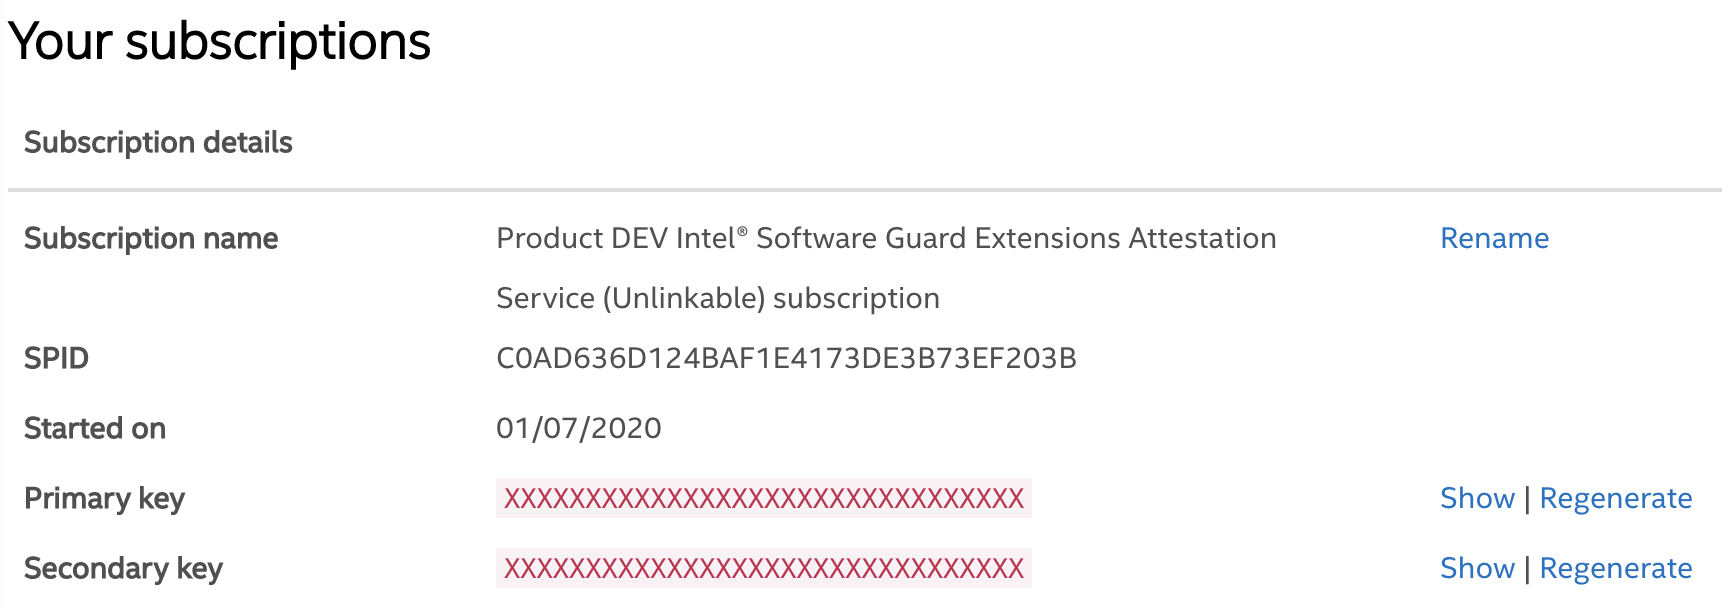
After you obtained your SPID and Primary key from Intel, you should embed them to your .profile file
as environment variables with the other two variables (SGX_MODE, NETWORK_HEX_ID) we mentioned above. So, make sure append
the following lines in your .profile file.
export SPID={YOUR_SPID}
export IAS_API_KEY={YOUR_PRIMARY_KEY}
Surely, remember to source the new .profile file:
$ source ~/.profile
# Prepare environment to run the chain
Prepare initial chain data and try to install Intel SGX if the SGX device is not ready.
$ sudo make create-path
$ sudo make chown-path user=$(id -u) group=$(id -g)
$ make prepare
# Run chain components
Run all the components of Cryto.com Chain with following command:
$ make run TX_QUERY_HOSTNAME={YOUR_INSTANCE_HOSTNAME}
Depending on where you will run your wallet in the next step, {YOUR_INSTANCE_HOSTNAME} can have different values:
| Wallet Location | {YOUR_INSTANCE_HOSTNAME} |
|---|---|
| In the same Azure machine | 127.0.0.1 |
| Remote (e.g. from your computer) | Azure instance IP address |
| Inside the node Docker network | Ignore TX_QUERY_HOSTNAME |
Then you can check if all containers are running normally:
$ docker ps

CONTAINER ID     IMAGE                           COMMAND                  CREATED STATUS   PORTS                                  NAMES
fc51af59593b     crypto-chain:develop            "client-rpc --port=2…"   -       -        0.0.0.0:26659->26659/tcp               client-rpc
bc586070744b     crypto-chain:develop            "chain-abci --chain_…"   -       -                                               chain-abci
ade1db657cd8     tendermint/tendermint:v0.32.8   "/usr/bin/tendermint…"   -       -        0.0.0.0:26656-26657->26656-26657/tcp   tendermint
800f173dccc7     crypto-chain:develop            "bash ./run_tx_query…"   -       -        0.0.0.0:26651->26651/tcp               sgx-query
Besides, you can check the chain-abci and Tendermint status by following commands:
$ docker logs -f chain-abci
[-T08:50:02Z INFO  chain_abci::app] received beginblock request
[-T08:50:02Z INFO  chain_abci::app] received endblock request
[-T08:50:02Z INFO  chain_abci::app] received commit request
[-T08:50:03Z INFO  chain_abci::app] received beginblock request
[-T08:50:03Z INFO  chain_abci::app] received endblock request
[-T08:50:03Z INFO  chain_abci::app] received commit request
...

$ curl 'http://localhost:26657/health'
{
  "jsonrpc": "2.0",
  "id": "",
  "result": {}
}
Congratulations! Crypto.com Chain is now running on your machine!
# Re-initialize a Crypto.com Chain
If you need to stop the processes and initialize a new chain, firstly you should stop all service and remove docker containers by:
$ make stop-all
$ make rm-all
And then clean all the storage used by Tendermint, Cryto.com Chain by:
$ make clean-data
Finally you can initialize a new chain by:
$ sudo make create-path
$ sudo make chown-path user=$(id -u) group=$(id -g)
$ make prepare
$ make run
If no error Check all containers
# Congratulations
Congratulations, now the environment to run Crypto.com Chain is all set. Let's on on and start sending your first transaction.