
# Send Your First Transaction
::: warning Caution This page is a continuation of running a local chain node of Getting Started for development.
For anyone interested more on wallet management, getting testing token from the faucet and sending transaction, please refer to ClientCLI. :::
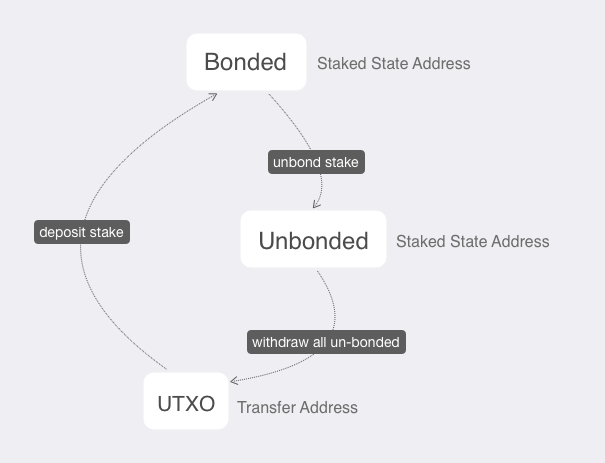
Before sending the transaction, please notice that the genesis fund is bonded (or staked) at the beginning. You first have to withdraw it to UTXO:
# Configuring your environment to connect
To start using the wallet, you have to configure your environment with the node information:
$ export CRYPTO_CHAIN_ID=test-chain-y3m1e6-AB
$ export CRYPTO_CLIENT_TENDERMINT=ws://127.0.0.1:26657/websocket
$ export CRYPTO_GENESIS_FINGERPRINT=934B7A20886EE47EC495AFFBF305809D5F4E9CDA6E41AECB0B10FABA74A922DC
If you are running your wallet on the same Azure machine, you can use the above configuration. If you are running the wallet on your local machine, you will have to change the ws://127.0.0.1:26657/websocket with the Azure instance public IP address.
# Restore the Default wallet
From the getting started section, we have already kicked off the Crypto.com Chain with the simple make commands and docker. However, there are multiple tendermint configs should be explained.
- Restore the HD wallet and name it as
Default:
$ ./target/debug/client-cli wallet restore --name Default

Enter passphrase:       // Enter your passphrase here
Confirm passphrase:     // Confirm your passphrase
Enter mnemonic:         // Copy the mnemonic words here
Confirm mnemonic:       // Confirm the mnemonic

Authentication token: b74ce4590ebc9d3c2a3adace926304384ae9451f43560c9702402be53811da8b
Then you will get the Authentication token, keep the token safe and it will be needed for all authorized commands.
A pre-created Hierarchical Deterministic(HD) Wallet wallet mnemonic with funds inside are prepared for you in Devnet. Kindly restore the wallet by using this mnemonic before moving on to the next step.
# Create Transfer & Staking Address
- First, you should init the two
Stakingtype address with theDefaultwallet you just restored:
$ ./target/debug/client-cli address new --name Default --type Staking
Enter authentication token:       // Input the Authentication token
New address: 0x45c1851c2f0dc6138935857b9e23b173185fea15
- Run another time and you will get the address that stores the unbonded funds.
$ ./target/debug/client-cli address new --name Default --type Staking
Enter authentication token:       // Input the Authentication token
New address: 0x2dfde2178daa679508828242119dcf2114038ea8
- Then, you should create a
Transfertype address to receive funds usingDefaultwallet:
$ ./target/debug/client-cli address new --name Default --type Transfer
Enter authentication token:       // Input the Authentication token
New address: dcro1ayhu0665wprxf86letqlv8x4ssppeu6awf7m60qlwds9268vltwsk6ehwa
To be clarified, the genesis fund is stored in a pre-created Hierarchical Deterministic(HD) Wallet mnemonic here. So we should restore it before making transactions.
- Therefore, you can check the bond status of the wallet by the following commands:
# To access wallet address state, you must sync your wallet first
$ ./target/debug/client-cli sync --name Default --disable-fast-forward
Enter authentication token:       // Input the Authentication token
Synchronizing: 1951 / 1951 [=================================] 100.00 % 930.09/s
Synchronization complete!

$ ./target/debug/client-cli state --name Default --address 0x2dfde2178daa679508828242119dcf2114038ea8

+-----------------+----------------------------+
| Nonce           |                          0 |
+-----------------+----------------------------+
| Bonded          |                 0.00000000 |
+-----------------+----------------------------+
| Unbonded        |        5000000000.00000000 |
+-----------------+----------------------------+
| Unbonded From   | 2019-11-20 08:56:48 +00:00 |
+-----------------+----------------------------+
| Jailed Until    |                 Not jailed |
+-----------------+----------------------------+
| Punishment Type |               Not punished |
+-----------------+----------------------------+
| Slash Amount    |               Not punished |
+-----------------+----------------------------+
Note: If you encounter a fingerprint mismatched error
$ ./target/debug/client-cli sync --name Default --disable-fast-forward
Enter authentication token:
Error: Verify error: genesis-fingerprint from tendermint 934B7A20886EE47EC495AFFBF305809D5F4E9CDA6E41AECB0B10FABA74A922DC does not match preset genesis-fingerprint DC05002AAEAB58DA40701073A76A018C9AB02C87BD89ADCB6EE7FE5B419526C8
Make sure you have exported the fingerprint manually
$ export CRYPTO_GENESIS_FINGERPRINT=934B7A20886EE47EC495AFFBF305809D5F4E9CDA6E41AECB0B10FABA74A922DC
# Withdraw the bonded funds
Bonded address: Previously generated address in your wallet to receive genesis funds
Transfer address: Wallet Transfer address we just generated
$ ./target/debug/client-cli transaction new --name Default --type Withdraw
Enter authentication token:       // Input the Authentication token
Enter staking address: 0x2dfde2178daa679508828242119dcf2114038ea8
Enter transfer address: dcro1ayhu0665wprxf86letqlv8x4ssppeu6awf7m60qlwds9268vltwsk6ehwa
Enter view keys (comma separated) (leave blank if you don't want any additional view keys in transaction):
# Leave blank because this tx is in same wallet
Transaction successfully created
- Then, you can
syncand checkbalanceof your wallet:
$ ./target/debug/client-cli sync --name Default --disable-fast-forward
Enter authentication token:       // Input the Authentication token
Synchronizing: 1951 / 1951 [=================================] 100.00 % 930.09/s
Synchronization complete!
- You can now check your
balance. Noted that theAvaiableonly includes the transferable balance and the bonded/unbonded amount are not included:
$ ./target/debug/client-cli balance --name Default
Enter authentication token:       // Input the Authentication token
+-----------+---------------------+
| Total     | 5000000000.00000000 |
+-----------+---------------------+
| Pending   | 0.00000000          |
+-----------+---------------------+
| Available | 5000000000.00000000 |
+-----------+---------------------+
Congratulations! You successfully withdraw all the unbonded genesis fund and now can transfer to others.
# Transfer CRO to another address
- First you can creat another wallet with the name
Bob, or whatever name you like. The wallet type could behd(Hierarchical Deterministic) orbasic:
$ ./target/debug/client-cli wallet new --name Bob --type hd
Enter passphrase:
Confirm passphrase:
Please store following mnemonic safely to restore your wallet later:
Mnemonic: cabin typical scheme rather hood sunny salon mansion hazard update video drill century athlete argue human discover dish arrow soccer science ocean puppy wagon
Authentication token: 650aca93fdb6e6eeb988026d92e796c28f0306390a49d6bfd75160ea07e6bcb6
- Get view-key of
Defaultwallet andBobwallet:
$ ./target/debug/client-cli view-key --name Default
Enter authentication token:       // Input the Authentication token of Default
View Key: 02b4dabfc862b9cb9f86b8d49520023aa0cccb2ad89446577dd0fee7bc946a79a1

$ ./target/debug/client-cli view-key --name Bob
Enter authentication token:       // Input the Authentication token of Bob
View Key: 03ef78b2751d43c3309b6ac68641e56528a23dc5678a201e43a7ed852511a1c276
::: tip Tip
The following 3 types of transactions: TransferTx, DepositStakeTx and WithdrawUnbondedTx, have some of their payloads obfuscated.
Sender could associate one or more view-keys onto the transactions. The view-key associated wallet could easily sync and view the transaction.
For more information, you could refer to Transaction Accounting Model
:::
- Create Transfer address, which is a Transfer address, of
Bobwallet:
$ ./target/debug/client-cli address new --name Bob --type Transfer
Enter authentication token:       // Input the Authentication token of Bob
New address: dcro135w20p56vdduzv5e4v4g2a9ucu6vw9k25aeyd7jfxuej66l4af9s7ycz35
- Then, you can transfer your tokens to Bob by:
$ ./target/debug/client-cli transaction new --name Default --type Transfer

Enter authentication token:       // Input the Authentication token of Default
Enter output address: dcro135w20p56vdduzv5e4v4g2a9ucu6vw9k25aeyd7jfxuej66l4af9s7ycz35
Enter amount (in CRO): 12345678   // CRO token amount you will transfer to Bob
Enter timelock (seconds from UNIX epoch) (leave blank if output is not time locked):    // Leave blank
More outputs? [yN]
Enter view keys (comma separated) (leave blank if you don't want any additional view keys in transaction):
02b4dabfc862b9cb9f86b8d49520023aa0cccb2ad89446577dd0fee7bc946a79a1,03ef78b2751d43c3309b6ac68641e56528a23dc5678a201e43a7ed852511a1c276
Transaction successfully created!
::: tip Tip
Remember to include Bob's view-key here.
:::
- Lastly, you can
syncand checkbalanceof Bob's wallet:
$ ./target/debug/client-cli sync --name Bob --disable-fast-forward
Enter authentication token:       // Input the Authentication token
Synchronizing: 5121 / 5121 [=================================] 100.00 % 1606.16/s
Synchronization complete!
Check the balance:
$ ./target/debug/client-cli balance --name Bob
Enter authentication token:       // Input the Authentication token of Bob
+-----------+-------------------+
| Total     | 12345678.00000000 |
+-----------+-------------------+
| Pending   | 0.00000000        |
+-----------+-------------------+
| Available | 12345678.00000000 |
+-----------+-------------------+
Congratulations! You've successfully transferred 12345678 CRO to Bob.
If you are interested in contributing or joining our testnet, you can continue reading the following sections about Running a Full Node to join Thaler Testnet and Local Full Node Development.
# Export & Import Tx
As mentioned before, sender should add the receiver's view-key to the transaction. Because sender can't push data directly to the receiver. However, it is also possible to send / receive a payment by directly exchanging the (raw) transaction payload data. The sender (who creates the transaction) would export it, the receiver would import it and check the transaction data locally and check the transaction ID against the distributed ledger. Following explains the flow:
Sender: Get your transaction id from the history, you may need to sync before running the following command:
$ ./target/debug/client-cli history --limit ? --offset ? --name <sender_wallet> Enter authentication token: ## Insert your authentication token ## +----------------+--------+--------+-----+--------------+------------+ | Transaction ID | In/Out | Amount | Fee | Block Height | Block Time | +----------------+--------+--------+-----+--------------+------------+ |<transaction_id>|........|........|.....|..............|............| +----------------+--------+--------+-----+--------------+------------+Sender: Export the target transaction payload from the sender's wallet:
$ ./target/debug/client-cli transaction export --id <transaction_id> --name <sender_wallet> Enter authentication token: ## Insert your authentication token ## ## transaction_payload_example ## eyJ0eCI6eyJ0eXBlIjoiVHJhbnNmZXJUcmFuc2FjdGlvbiIsImlucHV0cyI6W3siaWQiOiI3ZDk3NzVjNTcyODQ1ZjRlNzRjOGU5Y2Q1NjhkZjk4Mjk0NjQ1ODM1NDA5OGQzZDBlZjcxNzRmYmQ3NDdkMDhkIiwiaW5kZXgiOjF9XSwib3V0cHV0cyI6W3siYWRkcmVzcyI6InRjcm8xenR2MDZ6dzRtdHZ3NnhhZ25jMGdheTJkbXN5OHo5cjN4N2RwdGoycW5tdnBoNDY1YXQ5c251M2x1YSIsInZhbHVlIjoiMTAwMDAwMDAwMDAwIiwidmFsaWRfZnJvbSI6bnVsbH0seyJhZGRyZXNzIjoidGNybzFtODd5cTYwMmM2M2ZrY3p2ejZwcW5xY3JzOXZ0bnEzOHRuZjQ1a3lqMG1rdHY1ZGVkaDBxYTNmcHB2IiwidmFsdWUiOiI1OTk5ODk5OTk5OTk3ODg3IiwidmFsaWRfZnJvbSI6bnVsbH1dLCJhdHRyaWJ1dGVzIjp7ImNoYWluX2hleF9pZCI6IjQyIiwiYWxsb3dlZF92aWV3IjpbeyJ2aWV3X2tleSI6IjAzZDRkNWZiN2Q4MjJiZGUwZjYwOTgwNmU3ZTEzMDVmNTI3NjYzZmM5YWU2ZmZhMjJiNDVhMDc1NDRhOGU5OGY1YiIsImFjY2VzcyI6IkFsbERhdGEifV19fSwiYmxvY2tfaGVpZ2h0IjozMjQ2Mn0Receiver: The transaction can be imported into receiver's wallet by
$ ./target/debug/client-cli transaction import --tx <transaction_payload> --name <receiver_wallet>

Enter authentication token: ## Insert your authentication token ##

import amount: <transaction_amount>
Finally, receiver can verify this transaction by checking the transaction history:
$ ./target/debug/client-cli history --limit ? --offset ? --name <receiver_wallet>